
THE SHOOTIN' GUY Gun Reviews and knife reviews, and just about anything out of doors!
Tuesday, November 10, 2026

Saturday, November 7, 2026
How Sunspots Affect Radio Propagation:
Understanding the Sun's Influence on Your Radio
Amateur Radio • Shortwave Listening • Solar Activity • Radio Science
Have you ever tuned across the shortwave bands and noticed that some days you can hear stations thousands of miles away, while on other days those same frequencies seem almost completely silent?
One of the biggest factors influencing long-distance radio communication is our Sun.
Sunspots, solar flares, and other forms of solar activity have a tremendous effect on Earth's ionosphere, the region of the upper atmosphere that makes much of long-distance HF radio communication possible.
1. What Are Sunspots?
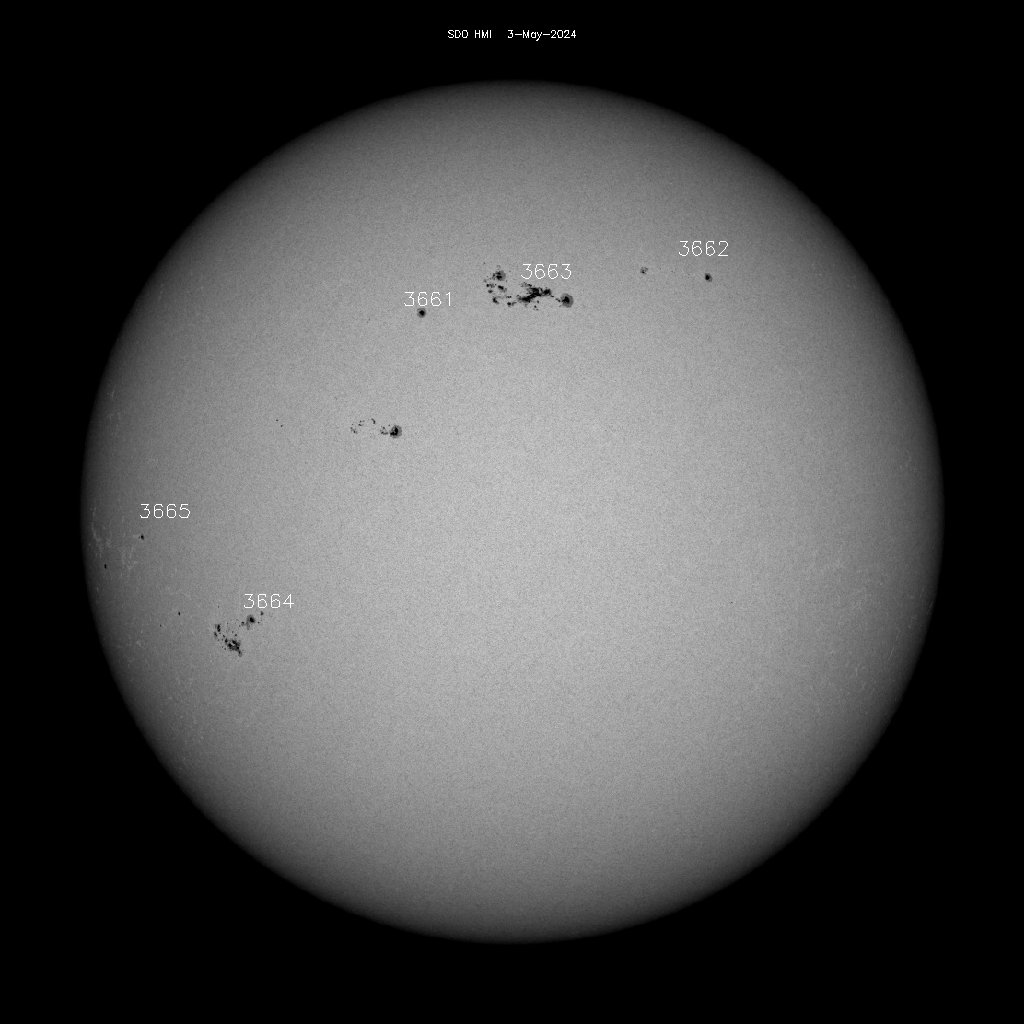
Sunspots are cooler, magnetically active regions on the Sun. Image: SOHO/NASA.
Sunspots are relatively dark, cooler areas on the Sun's visible surface caused by intense magnetic fields. Although they appear dark compared with the surrounding solar surface, they are still extremely hot.
The number of sunspots rises and falls in a repeating cycle that averages approximately 11 years. During periods of high sunspot activity, the Sun generally produces more ultraviolet radiation that affects Earth's ionosphere.
This increased solar activity can make long-distance HF radio communication possible on frequencies that might otherwise be difficult to use.
2. How the Ionosphere Helps Radio Signals Travel

Radio waves are refracted through the ionosphere and can return to Earth far beyond the horizon. Image: NASA Scientific Visualization Studio.
The ionosphere is a region of Earth's upper atmosphere containing electrically charged particles called ions and free electrons.
When certain radio waves enter the ionosphere, they are gradually refracted, allowing them to return toward Earth's surface. This makes it possible for radio signals to travel far beyond the visual horizon.
A signal can make multiple hops between Earth and the ionosphere, sometimes traveling thousands of miles. This is commonly called skywave propagation.
Without the ionosphere, many of the long-distance HF communications we enjoy would be much more difficult.
3. What Happens When Sunspot Numbers Increase?
During periods of increased solar activity, greater amounts of solar ultraviolet and extreme ultraviolet radiation help increase ionization in the ionosphere, particularly in the F region.
This generally improves propagation on the higher HF frequencies.
For amateur radio operators, this can mean better opportunities for contacts on:
- 10 meters (28 MHz)
- 12 meters (24 MHz)
- 15 meters (21 MHz)
- 17 meters (18 MHz)
- 20 meters (14 MHz)
These bands can sometimes open up to distant parts of the world when solar conditions are favorable.
4. When the Sun Becomes a Problem
More solar activity isn't always good news for radio operators.
Solar flares
Solar flares release bursts of X-ray and ultraviolet radiation. When these reach Earth, they can rapidly increase ionization in the lower ionosphere, particularly the D layer.
This can absorb HF radio signals, sometimes causing a sudden radio blackout on the sunlit side of Earth.
Geomagnetic storms
Coronal mass ejections (CMEs) can send enormous clouds of charged particles toward Earth. When these interact with Earth's magnetic field, they can disturb the ionosphere.
The result can be fading signals, unusual propagation, or even the loss of long-distance communications for a period of time.
See NASA's photograph of a strong solar flare.
5. Which Radio Bands Benefit From Solar Activity?
Here's a simplified guide to how different HF bands tend to behave:
| Amateur Band | General Characteristics |
|---|---|
| 10 meters | Excellent opportunities during high solar activity |
| 12 meters | Benefits greatly from increased solar activity |
| 15 meters | Often very good during active solar conditions |
| 17 meters | Frequently provides excellent DX opportunities |
| 20 meters | Reliable long-distance band across many conditions |
| 40 meters | Often useful during lower solar activity and at night |
| 80 meters | Particularly useful for nighttime regional and long-distance communication |
These are general tendencies, not fixed rules. Time of day, season, location, geomagnetic conditions, and atmospheric absorption all influence actual propagation.
6. How Can You Monitor Solar Activity?
If you enjoy amateur radio or shortwave listening, keeping an eye on solar conditions can help you decide which frequencies are worth monitoring.
Here are three useful resources:
- NOAA Space Weather Prediction Center: www.swpc.noaa.gov — Solar flares, geomagnetic storms, and space weather forecasts.
- SolarHam: www.solarham.com — A useful resource for amateur radio operators tracking solar conditions and HF propagation.
- HamQSL Solar-Terrestrial Data: www.hamqsl.com/solar.html — Solar indices and HF propagation information in an easy-to-read format.
Some important measurements to watch include:
- Sunspot Number (SSN): An indication of solar activity.
- Solar Flux Index (SFI): A measurement of solar radio emissions at 10.7 cm, commonly used as an indicator of solar activity.
- K-index: Measures disturbances in Earth's magnetic field.
- A-index: Indicates longer-term geomagnetic activity.
Generally, higher SFI and lower K-index values are favorable for many HF propagation conditions.
The Bottom Line
The Sun plays an enormous role in how well radio signals travel around the world.
When solar activity is favorable, frequencies that normally seem quiet can suddenly come alive with stations from distant countries. When solar storms occur, those same bands can become almost unusable.
For amateur radio operators and shortwave listeners, understanding sunspots and solar conditions can make the difference between hearing nothing and experiencing some remarkable DX reception.
The next time you hear a station thousands of miles away, remember: you may have the Sun to thank for bringing that signal to your radio!
Image and information credits: NASA, NASA Scientific Visualization Studio, and SOHO. Solar and ionosphere images are credited to their respective organizations. Additional educational resources are linked throughout this article.
Suggested labels: Amateur Radio, Shortwave Radio, Radio Propagation, Sunspots, Solar Cycle, Ionosphere, HF Communications, Space Weather
Sunspots and Radio Propagation –
A Short Explanation
Sunspots are areas of intense magnetic activity on the Sun. They affect radio propagation by increasing the amount of ultraviolet and X-ray radiation reaching Earth's upper atmosphere, particularly the ionosphere.

The ionosphere is important because it bends (refracts) certain radio waves back toward Earth, allowing signals to travel far beyond the horizon.
Here's how sunspot activity affects radio communications:
More sunspots: Generally mean greater ionization of the F2 layer, improving long-distance (DX) communication, especially on the 10, 12, 15, 17, and 20-meter amateur radio bands.
Fewer sunspots: Usually mean weaker ionization and poorer propagation on higher-frequency HF bands. Lower frequencies, such as 40 and 80 meters, often become more useful.
Solar flares: Can produce sudden bursts of X-rays that increase D-layer absorption, sometimes causing radio blackouts on the sunlit side of Earth.
Geomagnetic storms: Disturb the ionosphere and can severely disrupt HF propagation, even when sunspot numbers are high.
The bottom line: More sunspots generally mean better opportunities for long-distance HF radio communication, but solar activity can also create conditions that temporarily make radio propagation worse.
For amateur radio operators and shortwave listeners, the Sun can be both your best friend and your worst enemy!
Thursday, November 5, 2026
Tuesday, November 3, 2026
Thursday, October 29, 2026
How to Receive SSTV Images from the International Space Station with a Walkie-Talkie
Amateur Radio • Space Exploration • Slow-Scan Television (SSTV)


Imagine pointing a small handheld radio toward the sky, listening to a signal coming from astronauts aboard the International Space Station (ISS), and watching a picture from space appear on your phone or computer. You don't need an expensive radio station, a satellite dish, or a complicated setup to try it.
With a compatible walkie-talkie, a little patience, and free SSTV decoding software, you can receive images transmitted from the ISS when its crew and amateur-radio program schedule an SSTV event.
This guide walks you through the equipment, radio settings, satellite tracking, and image-decoding process.
1. What is SSTV?


SSTV stands for Slow-Scan Television. Rather than transmitting a conventional video stream, SSTV sends a still image as a series of audio tones. A receiving radio picks up those tones, and software converts them back into a picture.
The ISS has an amateur-radio program called ARISS — Amateur Radio on the International Space Station. During designated events, the station may transmit SSTV images that radio enthusiasts on the ground can receive.
The exciting part is that you can potentially capture these pictures with nothing more than a handheld radio and a phone or computer.
One important distinction: SSTV transmissions are not continuous. The ISS must be transmitting SSTV during the pass you are trying to receive. A normal ISS voice or repeater pass will not automatically produce pictures.
2. What equipment do you need?
You can get started with a basic setup. Better antennas and a good location can improve your results, but you do not need professional equipment.
Equipment | What to look for |
|---|---|
Walkie-talkie | A handheld radio that receives the specific VHF or UHF frequency announced for the SSTV event |
Antenna | The supplied antenna can work; a directional Yagi can improve reception |
Smartphone | Runs an SSTV decoder app |
Headphones or audio cable | Optional; useful for feeding clean radio audio into a decoder |
Satellite tracker | Helps you know when the ISS will pass overhead |
Important: An ordinary FRS/GMRS walkie-talkie generally cannot tune to the amateur-radio frequencies used for ISS SSTV. You need a radio with the appropriate receive-frequency coverage. You do not need an amateur-radio license merely to listen.
Which frequency should you use?
The correct frequency depends on the particular event. Two examples from ARISS activity are:
145.800 MHz — 2-meter VHF
Used for many traditional ISS SSTV events, commonly with the PD120 image mode.
437.550 MHz — 70-centimeter UHF
Used for some newer ARISS SSTV events, including the October 2026 event, with Robot 36 mode. Check event details
Do not assume either frequency is active. Check the event announcement before heading outside, and follow any frequency and mode changes.
ARISS+2
3. Find out when the ISS will pass overhead

Even if SSTV is transmitting, you can only receive the signal while the ISS is within radio range. A typical pass lasts several minutes, depending on the orbit and your location.
These websites help you plan:
N2YO.com — live satellite tracking and pass predictions: track the ISS and explore upcoming passes.
AMSAT — amateur satellite pass predictions: useful for amateur-radio satellite activity.
NASA Spot the Station: find viewing opportunities and learn about ISS visibility.
Heavens-Above: another option for satellite pass predictions.
How to plan a good pass
Set your location in N2YO or another pass-prediction service.
Find an upcoming ISS pass with a high maximum elevation. A pass reaching 45° or higher is a useful target.
Note the local start time, direction of approach, maximum elevation, and direction in which the station will disappear.
Set up your radio and SSTV app a few minutes before the predicted pass.
Stay listening throughout the pass. If an image transmission begins before you can hear the ISS, you may miss its first lines.
A high pass generally gives you a longer listening window and a better chance of receiving a complete image.
4. Set up your walkie-talkie

Once you have confirmed that an SSTV event is active, configure your radio as follows:
Enter the event's published downlink frequency.
Select FM receive mode, unless the event announcement specifies otherwise.
Turn the squelch down or fully open it. This helps you hear weak signals, although you may also hear background noise.
Disable unnecessary audio processing, noise reduction, or voice enhancement if your radio provides those options.
Use the supplied antenna initially, holding it clear of your body and away from nearby obstructions.
If possible, move outdoors to a location with a clear view of the sky.
Improving reception with an antenna
A handheld radio can receive ISS SSTV with its stock antenna, particularly on a high pass. For better results, try a small directional Yagi antenna designed for the band you are receiving.
Point the antenna toward the ISS as it moves across the sky. The ISS travels quickly, so you may need to adjust the antenna's direction during the pass.
If you use a UHF Yagi for a 437 MHz event, make sure it is designed for that frequency. A 2-meter antenna and a 70-centimeter antenna are not interchangeable without considering their design and performance.
A useful tip: Listen to the radio's speaker or headphones before connecting your phone. You should hear a distinctive sequence of electronic tones when SSTV is being transmitted, rather than ordinary speech.
5. Decode the picture with your smartphone
This is the fun part: converting the sound from the radio into a picture.
Option A: Use an Android phone
Robot36 — free SSTV decoder
Android
Get it from the Google Play Store or the F-Droid repository.
Robot36 decodes multiple SSTV formats, including Robot 36 and several PD modes.
Apps on Google Play+1
Install and open Robot36.
Allow microphone access.
Place the phone's microphone near the walkie-talkie's speaker.
Set the app to the mode announced for the event, if automatic detection does not select it.
Start listening before the next image transmission begins.
Keep the phone and radio steady and let the complete image transmission finish.
The image should gradually appear on the phone's display as the tones are decoded.
Option B: Use an iPhone or iPad
You can use an SSTV decoder such as SSTV Slow Scan TV by Black Cat Systems.
Place the iPhone microphone near the radio speaker and start the decoder. Check that the app supports the mode used in the current ISS event.
Option C: Use a Mac or computer
If you prefer a computer, you can feed the radio's audio into the computer using an appropriate audio connection and run SSTV decoding software.
Useful starting points include:
MultiScan 3B SSTV for Mac — an older Mac SSTV software resource; check compatibility with your macOS version.
AMSAT-UK's ISS SSTV guide — additional reception and decoding instructions.
Goonhilly WebSDR — listen through a remote radio receiver if you cannot receive the ISS locally.
Audio quality matters. Start with a moderate speaker volume. Excessive volume can distort the tones, while very low volume can prevent the decoder from recognizing them. If your radio has a headphone jack, an appropriate audio cable may give better results than holding a phone near the speaker.
6. Follow ARISS for SSTV announcements

The most important step is knowing when SSTV is actually turned on. Events can be postponed, interrupted for school contacts, or changed because of station operations.
Bookmark these resources:
ARISS-USA
Official US program information
ARISS-USA.org — news and information about amateur radio activities aboard the ISS.
ARISS International on X
Follow @ARISS_Intl for program updates and announcements.
ISS SSTV event announcements
Upcoming SSTV events — event dates, frequencies, modes, and transmission schedules.
ARISS SSTV image gallery
View received images and submit your own — see images received by other radio enthusiasts and check submission requirements.
You can also consult the ARISS SSTV FAQ for common questions, frequency guidance, and help with submitting images.
ariss-usa.org+1
7. What if you don't hear anything?
Don't assume your radio or decoder is broken. Check these common issues:
No signal: Confirm that an SSTV event is active and that the ISS is above your horizon.
You hear tones but see no image: Confirm microphone permission, app settings, and the SSTV mode.
The picture is incomplete: The ISS may have risen into range partway through a transmission or passed out of range before it finished.
The picture has lines, colors, or distortion: Try adjusting the volume, improving the antenna position, and moving away from electrical interference.
The signal fades repeatedly: The ISS is moving rapidly, and its changing position can affect reception. A directional antenna may help.
The frequency seems slightly off: Satellite motion causes Doppler shift, which can be especially noticeable on UHF. Follow the event's published tuning guidance.
SSTV pictures are transmitted in separate bursts, often with a pause between images. Keep listening through the gaps rather than giving up after the first burst.
8. Share your captured image

When you successfully decode an image, save it to your phone or computer. Record the date, time in UTC, frequency, SSTV mode, and approximate pass details. This information can help you compare reception quality and share your results with other enthusiasts.
You can submit qualifying captures through the ARISS SSTV gallery. Check the current event's submission rules and certificate deadlines before uploading. Some events offer electronic certificates for successful decodes.
ariss-usa.org+1
Remember to submit the original decoded image when required; don't digitally reconstruct a missing portion and represent it as an unedited radio capture.
Final checklist: Ready to receive pictures from space?
Your SSTV mission checklist
Receiving an image from the ISS is a rewarding introduction to satellite communications. Start with the radio you have, learn to recognize the SSTV tones, and work on improving your antenna and decoding setup one step at a time. With the right timing and a little patience, your walkie-talkie can become a window into space.
Clear skies and good reception!
Thursday, October 22, 2026
Thursday, October 15, 2026
Tuesday, October 13, 2026
Thursday, October 8, 2026
Tuesday, October 6, 2026
Thursday, October 1, 2026
Thursday, September 24, 2026
Tuesday, September 22, 2026
Thursday, September 17, 2026
Tuesday, September 15, 2026
Thursday, September 10, 2026
Tuesday, September 8, 2026
Thursday, September 3, 2026
Subscribe to:
Posts (Atom)